Explaination By Kali:
Try the following,
Login with the user who has functional administrator and goto pesonalization tab,
query the document path,
/oracle/apps/fnd/framework/webui/OAFooter
press go, once you get the doc name /oracle/apps/fnd/framework/webui/OAFooter
click on Personalize Page icon,
Clear all other default values and uncheck the site check box,
and select OAFWK_DIALOG_PG in Function.
Then apply,
You will get personalization struction the /oracle/apps/fnd/framework/webui/OAFooter at Function OAFWK_DIALOG_PG level,
Now change the rendered propertly to false for Privacy Link and Copy right.
Then check the dialog page.
Wednesday, July 16, 2008
Sunday, July 6, 2008
Creation Of the Anonymous page Introduction( By Kalimuthu Vellaichamy,Senior Consultant,Oracle )
1.1 Purpose
This document explains the OAFramework (ver 5.7 H for Apps 11.5.9 and 5.10 for Apps 11.5.10) Anonymous User page (like registration page) development and deployment in an instance and pack for the other instances.
This document assumes that the reader has a basic knowledge of OA Frmework page creation and deployment.
1.2 Background
This document should be used for creating Guest User pages and all type of registration pages. When this document fails to cover a topic, recommendations from OA Framework Development Team should be followed. If you have a Guest user page to display that does not require a user to log in.
1.3 Related Documents
1. OA Framework Developers’ Guide
2 Creation Of the Anonymous page
2.1 New page with anonymous user setup.
To create a page with anonymous setup we should have a standard OAFramework page with all the components required for the page.
We have to create the function for this page.
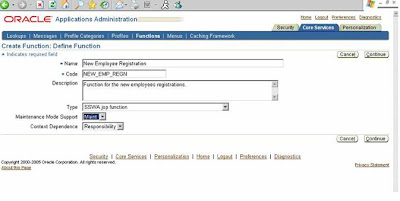
Let us consider a Registration page NewEmpRegistrationPG.xml and the registered function for this page is NEW_EMP_REGN.
We have to change the following properties for the MainRN for the page.
Rendered: ${oa.FunctionSecurity. NEW_EMP_REGN}
Security Mode: selfSecured

Use the following command to upload the page to the instance,
java oracle.jrad.tools.xml.importer.XMLImporter -username -password -dbconnection "(DESCRIPTION=(ADDRESS=(PROTOCOL=tcp)(HOST=)(PORT=))(CONNECT_DATA=(SID=)))" -rootdir ./ -rootPackage
Example.
java oracle.jrad.tools.xml.importer.XMLImporter NewEmpRegistrationPG.xml -username apps -password apps -dbconnection "(DESCRIPTION=(ADDRESS=(PROTOCOL=tcp)(HOST=I3SN021E.idc.oracle.com)(PORT=1610))(CONNECT_DATA=(SID=scmtrng)))" -rootdir ./ -rootPackage /xxt/oracle/apps/pon/registration/webui
2.2 Create a function for the new page
Use functional administrator (Self Service) or using system administrator (Forms) responsibility and create a function for the uploaded page.

After the function creation we have to add this function to a menu and the menu has to be granted to GUEST user.
2.3 Add the function to a new menu
Use fuctional administrator responsibility to create a new Menu. Add the created function with this new menu.
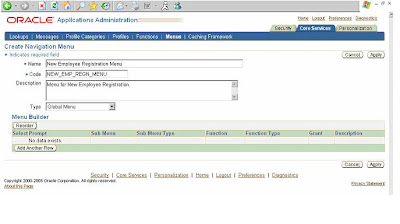

Now we are ready with the menu that is having a function, which points to a page which we want to access without the user log in.
If you want to give access to more than one page you can add, as many functions to the menu, like below.

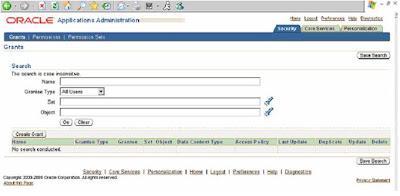
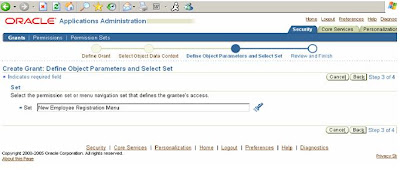
2.4 Create Grant for the created menu.
To create Grant for the menu we have created now, use Security Tab in the functional administrator responsibility. Follow the below mentioned steps.
Step I: Log on to Application with Functional Administrator Responsibility and click on functional administrator responsibility. Click on “Create Grant” button (To create a Global Grant)
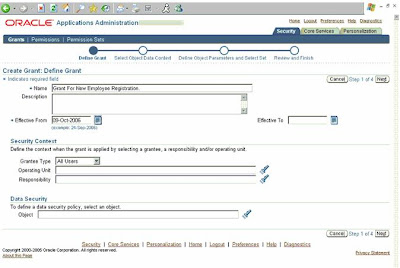
Step II: Enter the Grant Name and select Grantee Type as “All Users” and click “Next”
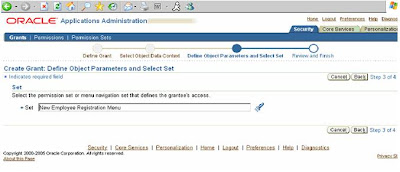
Step III: Enter the User Menu Name of the newly created Menu and click “Next”
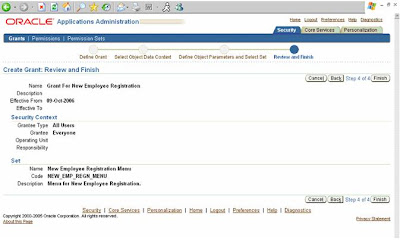
Step IV : Click “Finish” button
Step V: Again click on “Create Grant” (To create Guest Grant)
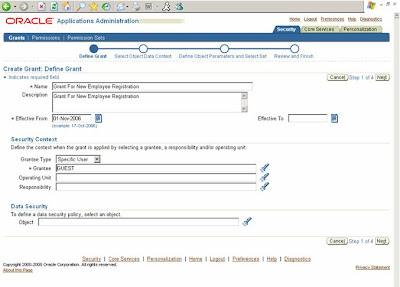
Step VI : Enter the Grant Name and select Grantee Type as “Specific User”. The page refreshes to display a new field called “Grantee” (If the page fails to refresh click “Next” button to go to the next screen and click “Back” button on the next screen to come back to this screen)
Enter “GUEST” in the “Grantee” field and click “Next”
Step VII: Enter the User Menu Name of the newly created Menu and click “Next”
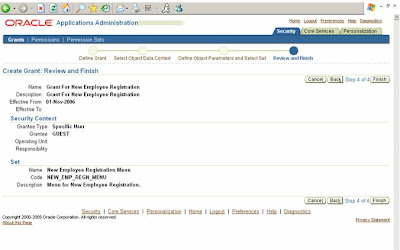
Step VIII : Click “Finish” button
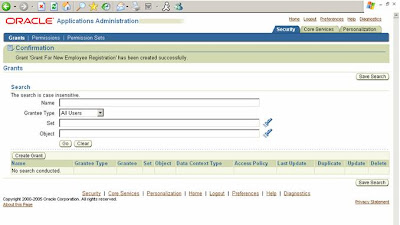
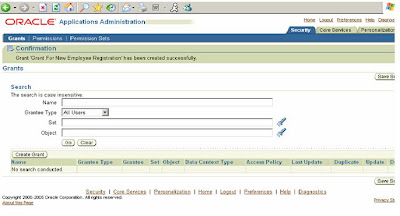
Step IX: Grant creations successfully completed.
3 Download and Upload the Grant
Following command used to download the created Grant.
FNDLOAD apps/apps 0 Y DOWNLOAD $FND_TOP/patch/115/import/afsload.lct XXTGUESTGRT_US.ldt GRANT GNT_MENU_NAME= NEW_EMP_REGN_MENU
To upload this grant into a new instance upload the page and the menu as usual and upload the Grant for the menu using the following command.
Following command used to upload the downloaded Grant.
FNDLOAD apps/apps 0 Y UPLOAD $FND_TOP/patch/115/import/afsload.lct XXTGUESTGRT_US.ldt
No we can access the newly created page without login into the applications using the following URL.
http://: /OA_HTML/OA.jsp?OAFunc=NEW_EMP_REGN
This document explains the OAFramework (ver 5.7 H for Apps 11.5.9 and 5.10 for Apps 11.5.10) Anonymous User page (like registration page) development and deployment in an instance and pack for the other instances.
This document assumes that the reader has a basic knowledge of OA Frmework page creation and deployment.
1.2 Background
This document should be used for creating Guest User pages and all type of registration pages. When this document fails to cover a topic, recommendations from OA Framework Development Team should be followed. If you have a Guest user page to display that does not require a user to log in.
1.3 Related Documents
1. OA Framework Developers’ Guide
2 Creation Of the Anonymous page
2.1 New page with anonymous user setup.
To create a page with anonymous setup we should have a standard OAFramework page with all the components required for the page.
We have to create the function for this page.
Let us consider a Registration page NewEmpRegistrationPG.xml and the registered function for this page is NEW_EMP_REGN.
We have to change the following properties for the MainRN for the page.
Rendered: ${oa.FunctionSecurity. NEW_EMP_REGN}
Security Mode: selfSecured

Use the following command to upload the page to the instance,
java oracle.jrad.tools.xml.importer.XMLImporter
Example.
java oracle.jrad.tools.xml.importer.XMLImporter NewEmpRegistrationPG.xml -username apps -password apps -dbconnection "(DESCRIPTION=(ADDRESS=(PROTOCOL=tcp)(HOST=I3SN021E.idc.oracle.com)(PORT=1610))(CONNECT_DATA=(SID=scmtrng)))" -rootdir ./ -rootPackage /xxt/oracle/apps/pon/registration/webui
2.2 Create a function for the new page
Use functional administrator (Self Service) or using system administrator (Forms) responsibility and create a function for the uploaded page.


After the function creation we have to add this function to a menu and the menu has to be granted to GUEST user.
2.3 Add the function to a new menu
Use fuctional administrator responsibility to create a new Menu. Add the created function with this new menu.


Now we are ready with the menu that is having a function, which points to a page which we want to access without the user log in.
If you want to give access to more than one page you can add, as many functions to the menu, like below.

2.4 Create Grant for the created menu.
To create Grant for the menu we have created now, use Security Tab in the functional administrator responsibility. Follow the below mentioned steps.

Step I: Log on to Application with Functional Administrator Responsibility and click on functional administrator responsibility. Click on “Create Grant” button (To create a Global Grant)

Step II: Enter the Grant Name and select Grantee Type as “All Users” and click “Next”

Step III: Enter the User Menu Name of the newly created Menu and click “Next”

Step IV : Click “Finish” button

Step V: Again click on “Create Grant” (To create Guest Grant)

Step VI : Enter the Grant Name and select Grantee Type as “Specific User”. The page refreshes to display a new field called “Grantee” (If the page fails to refresh click “Next” button to go to the next screen and click “Back” button on the next screen to come back to this screen)
Enter “GUEST” in the “Grantee” field and click “Next”

Step VII: Enter the User Menu Name of the newly created Menu and click “Next”

Step VIII : Click “Finish” button

Step IX: Grant creations successfully completed.
3 Download and Upload the Grant
Following command used to download the created Grant.
FNDLOAD apps/apps 0 Y DOWNLOAD $FND_TOP/patch/115/import/afsload.lct XXTGUESTGRT_US.ldt GRANT GNT_MENU_NAME= NEW_EMP_REGN_MENU
To upload this grant into a new instance upload the page and the menu as usual and upload the Grant for the menu using the following command.
Following command used to upload the downloaded Grant.
FNDLOAD apps/apps 0 Y UPLOAD $FND_TOP/patch/115/import/afsload.lct XXTGUESTGRT_US.ldt
No we can access the newly created page without login into the applications using the following URL.
http://
Tuesday, July 1, 2008
Disable Browser Back Button in OAF
Hi all,
These days I am so muh busy with SOA, ADF and Bpel projects that I do not get time to write articles. But recently helped a friend in old team for fixing browser back button in one of his OAF transaction pages which was creating error in his page.
Basically a small trick used in various J2EE projects in javascript helps to sort of nullify the browser back button in oaf page. This is what you need to do,
Put following code in process request of OAF page :
OABodyBean bodyBean = (OABodyBean) OAPageContext.getRootWebBean();
String javaS = “javascript:window.history.forward(1);”;
bodyBean.setOnLoad(javaS);
Actually window.history.forward(1) would push the current page ahead in the "visited pages history". A negative number like -1 would restore the previous visited page from browser's cache. Zero is relative to the current (displayed) page. Positive numbers would navigate forward.
If the page number (positive) does not exist in history, your browser will create an entry "copying" the current page to it and setting it as the current entry, so that the previous and actual are the same.
Using window.history.forward(1) does not disable "Back button". The button will work BUT as this script runs on page loading, it will send you "ahead" the history, which stored URL (or page) is the same. So it works like a "Refresh" button, without actually refreshing content from server, but just restoring from cache.
Hope this helps all.
Subscribe to:
Comments (Atom)